


Wordpress single post template (image gallery) WordPress
- SOLVED
Hi,
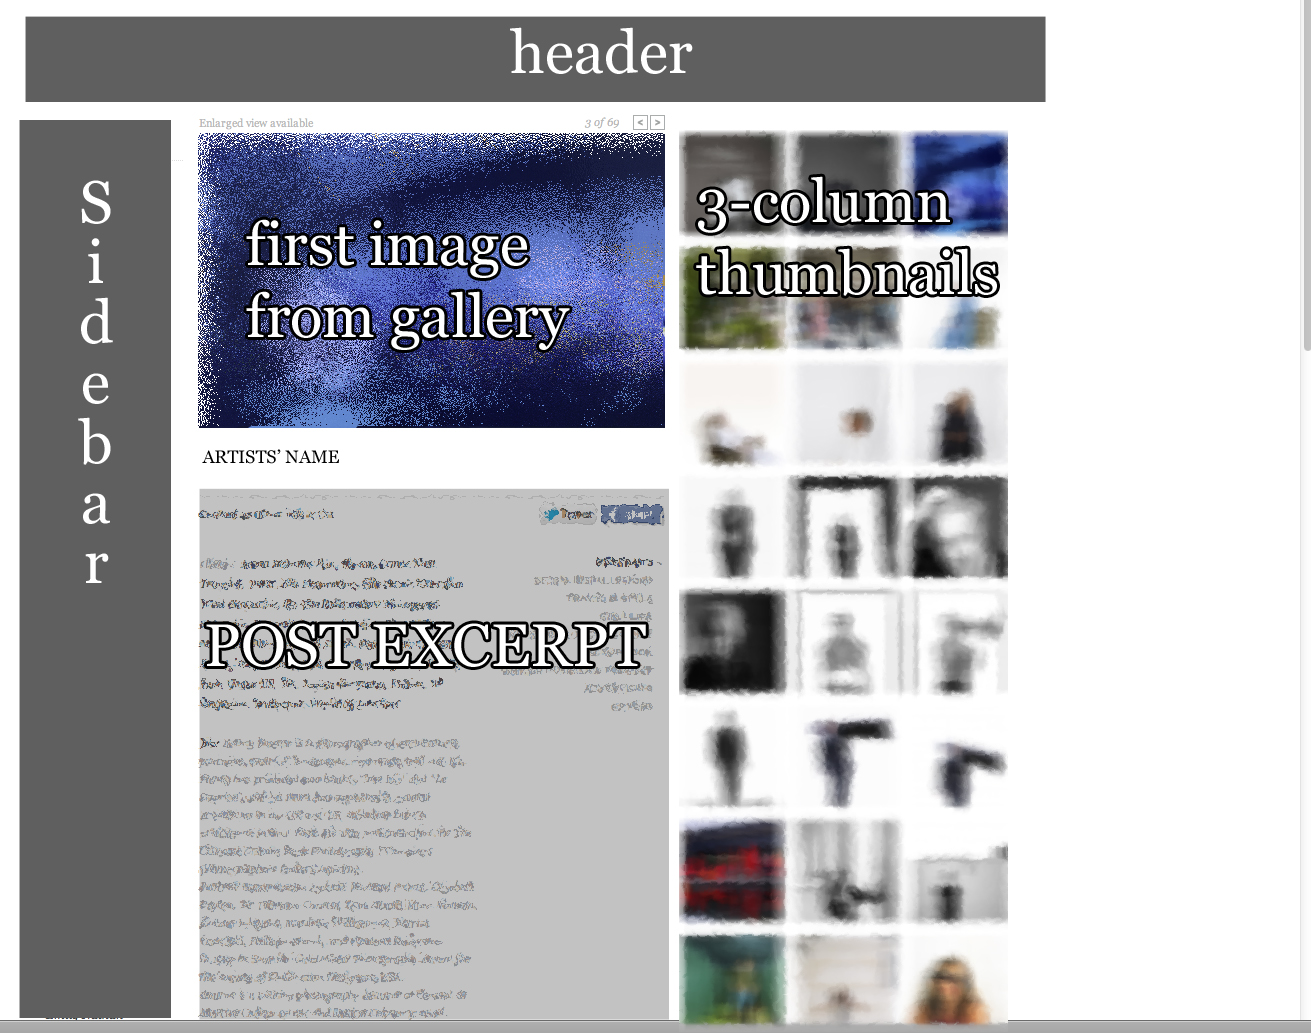
I need to create a template for displaying a photographer's image gallery. What I am trying to recreate can be seen in the image I have uploaded.
I have my header and sidebar sorted out, but I need to code the image gallery.
What I want to appear (after the sidebar):
Assuming the sidebar is Column Zero.
> Column One: the first image in the gallery to be enlarged and displayed, followed by the post title, followed by the post text below the image
> Column Two: A three column grid of image thumbnails of the entire post. When clicked it will enlarge the image in Column One.
Cheers!
Answers (5)

John Cotton answers:
Does this look like the kind of thing you want?
http://www.my-dream-wedding.co.za/areas/eastern-cape/kathleen-barry-bespoke-occasion-jewellery/

ditzydeezy comments:
Not exactly.
[[LINK href="http://www.ba-reps.com/artists/alexa-singer#image_431204"]]This link[[/LINK]] (http://www.ba-reps.com/artists/alexa-singer#image_431204) is what I want.
John Cotton comments:
<blockquote>Not exactly.</blockquote>
It's not exactly the same since it's not the same layout! But it's a big picture with a series of thumbnails.... :)
Looking at that link and your image, I can promise you there are technically the same - just different HTML. Trust me :)
Th wedding one uses the [[LINK href="http://www.twospy.com/galleriffic/"]]Gallerriffic plugin[[/LINK]] which is an excellent library. You can create the HTML as you like, but the code to do it is like this:
<?php

	global $post;


	// Get the images attached to current post

	// Note that they do not need to be reference in the actual HTML of the post, just attached to it

	$args = array( 'post_type' => 'attachment', 'numberposts' => -1, 'post_status' => null, 'post_parent' => $post->ID );

	$attachments = get_posts($args);


	if ($attachments) {	// If we have some....


?>

		<!-- You need to reference the scripts and css which can be got from http://www.twospy.com/galleriffic/. Change the paths below to match where you put them in your theme -->

		<link rel="stylesheet" media="all" href="<?php echo get_stylesheet_directory_uri(); ?>/js/jquery.galleriffic.css" />

		<script type="text/javascript" src="<?php echo get_stylesheet_directory_uri(); ?>/js/jquery.galleriffic.js"></script>

		<script type="text/javascript" src="<?php echo get_stylesheet_directory_uri(); ?>/js/jquery.opacityrollover.js"></script>

		<script type="text/javascript">

			jQuery(document).ready(function($) {

				// Initially set opacity on thumbs and add additional styling for hover effect on thumbs

				var onMouseOutOpacity = 0.67;

				$('#gallery-thumbs ul.thumbs li').opacityrollover({

					mouseOutOpacity:   onMouseOutOpacity,

					mouseOverOpacity:  1.0,

					fadeSpeed:         'fast',

					exemptionSelector: '.selected'

				});


				// Initialize Galleriffic Gallery - all these settings are described on their website

				var gallery = $('#gallery-thumbs').galleriffic({

					delay:                     2500,

					numThumbs:                 27,

					preloadAhead:              5,

					enableTopPager:            false,

					enableBottomPager:         false,

					maxPagesToShow:            1,

					enableKeyboardNavigation:  false,

					imageContainerSel:         '#gallery-slideshow',

					captionContainerSel:       '#gallery-caption',

					loadingContainerSel:       '#gallery-loading',

					renderSSControls:          false,

					renderNavControls:         false,

					enableHistory:             false,

					autoStart:                 false,

					syncTransitions:           true,

					defaultTransitionDuration: 900,

					onSlideChange:             function(prevIndex, nextIndex) {

						// 'this' refers to the gallery, which is an extension of $('#thumbs')

						this.find('ul.thumbs').children()

							.eq(prevIndex).fadeTo('fast', onMouseOutOpacity).end()

							.eq(nextIndex).fadeTo('fast', 1.0);

					},

					onPageTransitionOut:       function(callback) {

						this.fadeTo('fast', 0.0, callback);

					},

					onPageTransitionIn:        function() {

						this.fadeTo('fast', 1.0);

					}

				});

			});

		</script>


		<!-- this is the HTML you need to play with to get your layout -->


		<!-- You can size and position this div to match where you want the large image -->

		<div id="gallery">

			<div id="gallery-controls"></div>

			<div class="slideshow-container">

				<div id="gallery-loading"></div>

				<div id="gallery-slideshow"></div>

			</div>

			<div id="gallery-caption"></div>

		</div>


		<!-- You can size and position this div to match where you want the thumbnails -->

		<!-- By floating left the li elements, you can create your three column layout - the width of the gallery-thumbs div will dictate how many columns there area (ie div-width/thumbnail-width) -->

		<div id="gallery-thumbs">

			<ul class="thumbs noscript">

	<?php

			foreach ( $attachments as $attachment ) {

				$title = apply_filters( 'the_title' , $attachment->post_title );

				$full_src = wp_get_attachment_image_src( $attachment->ID, 'full' );


				// The array parameter in this call determines the size of the thumbnail

				// Really, you need to have your media settings set at 100 x 100 to ensure WordPress sizes images correctly

				$thumb_src = wp_get_attachment_image_src( $attachment->ID, array( 100, 100) );


	?>

				<li>

					<a class="thumb" href="<?php echo $full_src[0]; ?>" title="<?php echo $title; ?>">

						<img src="<?php echo $thumb_src[0]; ?>" alt="<?php echo $title; ?>" width="<?php echo $thumb_src[1]; ?>" height="<?php echo $thumb_src[2]; ?>" style="width: <?php echo $thumb_src[1]; ?>px; height: <?php echo $thumb_src[2]; ?>px"  />

					</a>

					<!-- you can add more html here - captions for instance - see gallerific website for options

				</li>

	<?php

			}

	?>

			</ul>

		</div>


<?php

	}

?>
You'll probably need to tweak that to get exactly what you want (moving the html around and apply css) but that will get you 90% of the way there.
JC
ditzydeezy comments:
Hi,
Can you please explain the difference between examples 2, 3 & 4 that is listed on the site? I am not familiar with the plugin and cannot see the differences.
Example 2: http://www.twospy.com/galleriffic/example-2.html
Example 3: http://www.twospy.com/galleriffic/example-3.html
Example 4: http://www.twospy.com/galleriffic/example-4.html (okay, so you can reinsert images, does that mean it regenerates when you change the gallery?)
Btw, I don't want any of the fading effects. I just want the thumbnails to be full opacity and to open the image when it clicks. How would I just get rid of that?
Also, would that whole script that you posted go into my post-template .php file?
And since you seem pretty familiar with Gallerific, could you please tell me in which order I should place the DIVs to get that same layout order in the example-link I posted? Besides just repositioning the DIVs, would I need to call them out with php?
Thanks. I am quite new to all of this.
John Cotton comments:
2: Version with thumbnails and demonstrating a cross-fade on the main image change
3: Version with thumbnails and demonstrating a cross-fade on the main image change + history (note how the address bar changes as you change thumbs - try hit the back button on your browser and see what happens)
4: Version with thumbnails and demonstrating a cross-fade on the main image change + history + showing how to add/remove images after the initialisation.
You shouldn't need more than 2 at this point and that is effectively what you got with my code.
<blockquote>Btw, I don't want any of the fading effects. I just want the thumbnails to be full opacity and to open the image when it clicks. How would I just get rid of that? </blockquote>
Remove the opacityrollover.js file and these lines:
				// Initially set opacity on thumbs and add additional styling for hover effect on thumbs


				var onMouseOutOpacity = 0.67;


				$('#gallery-thumbs ul.thumbs li').opacityrollover({


					mouseOutOpacity:   onMouseOutOpacity,


					mouseOverOpacity:  1.0,


					fadeSpeed:         'fast',


					exemptionSelector: '.selected'


				});
<blockquote>Also, would that whole script that you posted go into my post-template .php file? </blockquote>
If you only ever want to use this code in one place, then yes. Personally, I have it in a gallery.php file which I include_once in the places I want it.
<blockquote>could you please tell me in which order I should place the DIVs to get that same layout order in the example-link I posted?</blockquote>
Taking the HTML from that page and merging in my PHP, you get something like this:
<div class="content">


	<div class="col-one">

		<!-- vertical menu -->

	</div>


	<div class="col-two-sm photo_module">


		<div id="gallery">


			<div id="gallery-controls"></div>


			<div class="slideshow-container">


				<div id="gallery-loading"></div>


				<div id="gallery-slideshow"></div>


			</div>


			<div id="gallery-caption"></div>


		</div>


		<div class="artist">

		  	<!-- content under photo -->

		  </div>

	</div>


	<div class="col-three">

		<!-- You can size and position this div to match where you want the thumbnails -->

		<!-- By floating left the li elements, you can create your three column layout - the width of the gallery-thumbs div will dictate how many columns there area (ie div-width/thumbnail-width) -->

		<div id="gallery-thumbs">

			<ul class="thumbs noscript">

	<?php


			foreach ( $attachments as $attachment ) {


				$title = apply_filters( 'the_title' , $attachment->post_title );


				$full_src = wp_get_attachment_image_src( $attachment->ID, 'full' );


				// The array parameter in this call determines the size of the thumbnail

				// Really, you need to have your media settings set at 100 x 100 to ensure WordPress sizes images correctly

				$thumb_src = wp_get_attachment_image_src( $attachment->ID, array( 100, 100) );

	?>


				<li>

					<a class="thumb" href="<?php echo $full_src[0]; ?>" title="<?php echo $title; ?>">

						<img src="<?php echo $thumb_src[0]; ?>" alt="<?php echo $title; ?>" width="<?php echo $thumb_src[1]; ?>" height="<?php echo $thumb_src[2]; ?>" style="width: <?php echo $thumb_src[1]; ?>px; height: <?php echo $thumb_src[2]; ?>px"  />

					</a>

					<!-- you can add more html here - captions for instance - see gallerific website for options

				</li>

	<?php

			}

	?>


			</ul>

		</div>

	</div>

  </div>
ditzydeezy comments:
Thanks John. So going from this, I will need to style the css for:
col-one (basically done for my sidebar)
gallery-caption
artist
col-three
thumbs noscript ul (? is this how I would call it in css to remove the list-type?)
col-two-sm photo_module - do I need to style this or just "gallery"? I.e. do I need to style both the div class and the div id?
I assume these do not need css styling?
gallery-controls
gallery-loading
gallery-slideshow
Btw I have put the code into my file (I also call it gallery.php), and on my page right now it is only loading the post-attachment image and not the other images in the post.
I have attached my gallery.php file and the specific post is up here: http://uglyd.com/uglydwordpress/hello-world/
ditzydeezy comments:
aww dang it doesn't allow me to post a .php file.
ditzydeezy comments:
Okay things are going wonky now and I'm getting
Parse error: syntax error, unexpected $end in /home/uglydco/public_html/uglydwordpress/wp-content/themes/custom/gallery.php on line 150
Line 150 is <?php get_footer(); ?>
John Cotton comments:
<blockquote>thumbs noscript ul (? is this how I would call it in css to remove the list-type?)</blockquote>
You've got a choice of selectors, but you should try to make it as specific as possible if you only from the list-type removed from this one.
<blockquote>do I need to style both the div class and the div id? </blockquote>
Again, make your css specific for the task in hand. The id is a better choice usually when targeting a specific div.
<blockquote>I assume these do not need css styling?</blockquote>
Well, they may - it all depends on how you want things to look. Styling or not is not related to the javascript (well, mostly).
<blockquote>right now it is only loading the post-attachment image and not the other images in the post. </blockquote>
Then either your other images are attached to the post or you haven't implemented the code as I gave it to you. That code was lifted straight from a live project and so definitely works.
<blockquote>Okay things are going wonky now and I'm getting
Parse error: syntax error, unexpected $end in /home/uglydco/public_html/uglydwordpress/wp-content/themes/custom/gallery.php on line 150</blockquote>
The error (probably a missing bracket or semi-colon) will be before then.
It doesn't sound like you are very familiar with PHP. From the code I gave you, it should have been about 15-30 minutes to implement.
This kind of thing is not really a beginner project - you might be better off getting a developer in to help you.
JC
ditzydeezy comments:
Ugh, yeah it seems so. I realized that it was pretty complex which was why I offered a high price.
Someone from the site messaged me to offer to code it for me, I think I might go with that.
Now I just need to figure out how to award the money?
John Cotton comments:
<blockquote>Someone from the site messaged me to offer to code it for me, I think I might go with that.</blockquote>
No problem. If it doesn't work out, let me have the access details (send them through the pm) and I will happily take a look and get things working.
<blockquote>Now I just need to figure out how to award the money?</blockquote>
You need to close the questions first, then vote.
JC

Clifford P answers:
Just browsing through, I like the style you've chosen, although I don't like the HTML Anchor Link text in the URL (the '#' sign in the URL after clicking each different picture) - it's messy with the browser's Back Button. Although it could be good for linking to each individual photo separately if that's desired...
Anyway,
I didn't see the enqueued javascript for Gallerific. Do you already have that in functions.php or somewhere else?
The page template's Gallerific settings won't do anything unless the Gallerific javascript is on the page (put there by functions.php).
ditzydeezy comments:
Hi Cliff,
Are you talking about the # on the link I provided as an example? Or are you talking about John's ideas?
I did notice that javascript was not activated along with the other .js scripts. I do not have it enqueued in functions.php. I did some searching and it seems that it is enqueued for specific functions (like google analytics) and not as a whole.
What would need to go into my functions.php?
Clifford P comments:
Gallerific info: [[LINK href="http://www.twospy.com/galleriffic/"]]http://www.twospy.com/galleriffic/[[/LINK]]
The anchor links = Gallerific History Plugin:
history plugin (watch URL as you click): [[LINK href="http://www.twospy.com/galleriffic/example-3.html"]]http://www.twospy.com/galleriffic/example-3.html[[/LINK]]
w/o history plugin (no URL change as you click): [[LINK href="http://www.twospy.com/galleriffic/example-1.html"]]http://www.twospy.com/galleriffic/example-1.html[[/LINK]]
WP PLUGIN:
You could just install this plugin: [[LINK href="http://wordpress.org/extend/plugins/wp-galleriffic/"]]http://wordpress.org/extend/plugins/wp-galleriffic/[[/LINK]]
THEME FUNCTION:
Instead of using the plugin, you could just do these steps:
1) Using FTP:
In your theme directory, create a new directory called 'js' then create a new directory called 'gallerific'.
2) Download the .js file(s) you want ([[LINK href="http://code.google.com/p/galleriffic/source/browse/#svn/trunk/example"]]http://code.google.com/p/galleriffic/source/browse/#svn/trunk/example[[/LINK]])
3) Save the .js files you want into this directory: wp-content/themes/your-theme-name/js/gallerific/
4) Add this to your theme's functions.php file, in this directory: wp-content/themes/your-theme-name/
code:
	function myfunction_gallerific_script_init() {

		if( ! is_admin() ){

		wp_register_script( 'gallerific', get_bloginfo( 'template_url' ) .'/js/gallerific/jquery.galleriffic.js', array( 'jquery' ) );

		wp_enqueue_script( 'gallerific' );

	 }

	}

	add_action( 'init', 'myfunction_gallerific_script_init' );
Let me know how that works... we might also need to include Gallerific's CSS and other .js files based on which ones you want to use...
Or, maybe try using the WP-Gallerific plugin instead. Your choice. Pros and cons...
:) Let me know how it goes and what else I can help with.
Clifford P comments:
I see that John Cotton's template code attempted to add some Gallerific code, but you said it didn't work. You shouldn't have both his code and the functions.php code.
Also, my functions.php code will embed the script on all of your WordPress pages/posts. You could add some code to only add the scripts when needed (per page, not in the admin area, etc.). Just depends on what you want/need.

Julio Potier answers:
I did it (without gallerific)
Julio Potier comments:
Yes of course i can :
JS (only my code):
function jq_head()

{

	wp_enqueue_script( 'jquery' );

}

add_action( 'init', 'jq_head' );


function jq_pic()

{

echo '

<script>

jQuery(".thumbs a.thumb").click(function(e){

e.preventDefault();

jQuery("#mainpic").attr("src", jQuery(this).attr("href") );

return false;

});

</script>

';

}

add_action( 'wp_footer', 'jq_pic' );
CSS (only my code):
.col-three{

	float:left;

	margin-left: -35px;

}

#bio{

	float:left;

	width:480px;

	margin:14px 0px 0px 10px;

}

ul.thumbs{

	list-style:none;

}

ul.thumbs li{

	float:left;

	margin: 0px 5px 2px 0px;

}

ul.thumbs li:nth-child(4n){

clear:both;

}
HTML/php (full code) :
<?php

/*

Template Name Posts: Gallery

*/


get_header();

global $post;

$querystr = 'SELECT ' . $wpdb->prefix . 'posts.post_excerpt AS "imageTitle", ' . $wpdb->prefix . 'posts.guid AS "imageGuid" FROM ' . $wpdb->prefix . 'posts WHERE ' . $wpdb->prefix . 'posts.post_parent = '. $post->ID .' AND	' . $wpdb->prefix . 'posts.post_type = "attachment" ORDER BY "menu_order" LIMIT 1';

global $wpdb;

$post_item = $wpdb->get_row($querystr);

$first_attachment = $post_item->imageGuid;

$args = array( 'post_type' => 'attachment', 'numberposts' => -1, 'post_status' => null, 'post_parent' => $post->ID );

$attachments = get_posts($args);

if ($attachments) {

?>

<div class="container">

	<div class="sidebar">

		<?php get_sidebar(); ?>

	</div>

	<div class="img">

		<?php if(have_posts()) : ?><?php while(have_posts()) : the_post(); ?>

		<div id="artist">

			<?php the_title(); ?>

		</div>

		<div id="bio">

			<?php

			echo '<img id="mainpic" src="'.$first_attachment.'" width="480" />';

			the_content();

			?>

		</div>

		<div class="col-three">

			<div id="gallery-thumbs">

				<ul class="thumbs noscript">

					<?php

					foreach ( $attachments as $attachment ) {

						$title = apply_filters( 'the_title' , $attachment->post_title );

						$full_src = wp_get_attachment_image_src( $attachment->ID, 'full' );

						$thumb_src = wp_get_attachment_image_src( $attachment->ID, array( 100, 100) );

						?>

						<li>

							<a class="thumb" href="<?php echo $full_src[0]; ?>" title="<?php echo $title; ?>" rel="<?php echo $full_src[0]; ?>" >

								<img src="<?php echo $thumb_src[0]; ?>" alt="<?php echo $title; ?>" width="<?php echo $thumb_src[1]; ?>" height="<?php echo $thumb_src[2]; ?>" style="width: <?php echo $thumb_src[1]; ?>px; height: <?php echo $thumb_src[2]; ?>px"  />

							</a>

						</li>

						<?php

					}

					?>

				</ul>

			</div>

		</div>

	</div>

</div>

<?php

endwhile; endif;

}

get_footer();

?>
I talk to ditzydeezy and suggest her to raise price to give john and cliff some money ;)

Just Me answers:
Completely different approach but have you tried using a shop plugin?
The product image will be the main image, the product description will be the text, the product name will be the title.
I am a fan of the Shopp plugin, but there are other plugins out there.
The only thing you will probably have to do is adjust the css of the thumbnails to make them show up at the right side of the screen instead of somewhere near/below the main image, which is a common place to put them when creating a webshop.

Gabriel Reguly answers:
Hi Julio,
Would you mind posting your solution?
Hi ditzydeezy,
Please use this link to vote: [[LINK href="http://wpquestions.com/question/pickAWinner/id/3513"]]Vote to award prize[[/LINK]]
Regards,
Gabriel